Muscle Gain Secrets 5:
How To Get “The Rock” Shoulder
Everyone wants to have “The Rock” shoulder & Washboard Abs! These are the aesthetic muscles that make you look good with or without clothes.
First, let’s start off with “The Rock” Shoulders. Some even call it the “Diamond Delts” and even“ The Boulders”. Whatever you call it, round, rock-solid and striated shoulders are highly sought after by anyone who are into fitness.
So how do you get “The Rock” Shoulder? Essentially there are 3 angles you need to tackle to have round, solid deltoids or ‘delts’, which are: Front Delts, Middle Delts, and Rear Delts. Here are my simplified and complete workouts to fully engage every angle of your delts in making them pop:
1) Lateral shoulder raise
2) Standing side deltoid circle raise
3) Seated overhead military press
4) Seated alternated dumbbell press
5) Upright rowing
6) Seated bent-over rear deltoid raise
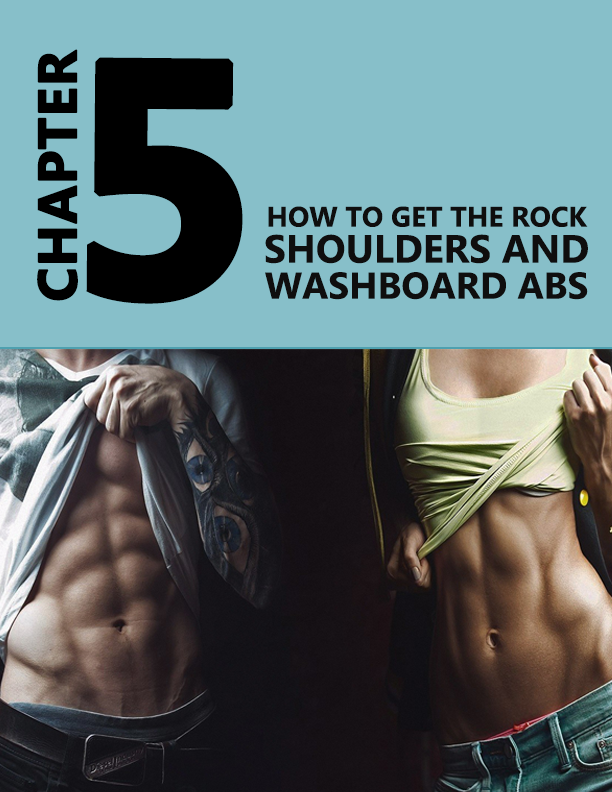
1) Lateral Shoulder Raise
Lateral Shoulder Raise, the best lateral deltoid exercise in history. This is the best exercise to sculpt round shoulders and giving others the impression of you having huge and wide shoulders.
-
Position the height of the seat so that the feet are firmly planted on the floor. This gives resistance against the floor and assists in balance and stability while lifting. The seat should be adjusted to a comfortable position to perform the movement.
-
Depends on the type equipment you use – whether it’s Dumbbell or Lateral Raise Machine, you either place the forearms against the pads or grip the handles. Start with your arms at your sides.
-
If you’re using a machine, raise the arms up while pushing against the forearm pads. If you’re using dumbbells, simply raise those dumbbells laterally.
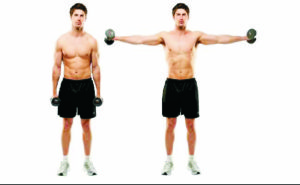
2) Standing Side Deltoid Circle Raise
Standing Side Deltoid Circle Raise, one of the best exercise for overall shoulder muscles development in all different angles.
-
Pick up the weights with your palms facing each other. Try to use your legs to lift the weight, rather than your back. Keep the back straight and the head up.
-
Stand up straight with your feet positioned in a comfortable stance so you are well balanced and relaxed. The feet should be about shoulder-width apart; the arms should be fully extended at your sides with a dumbbell in each hand.
-
You begin with both dumbbells hang on your side. At the same time, raise both dumbbells out to the sides, bringing them up just above shoulder height. It is acceptable to flex the elbows slightly as the weights are brought up.
-
Lower the weights using the same lateral motion with which they were raised.
Usually, you can’t go heavy on this exercise. So take a light weight and perform 8-10 circles of each set of this exercise.
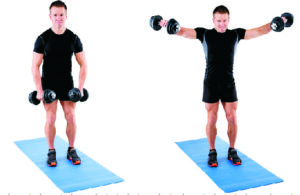
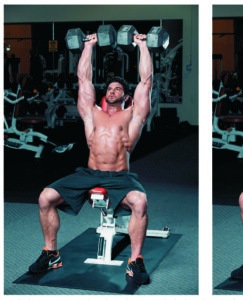
3) Seated Overhead Military Press
Seated Overhead Military Press, a power movement to develop the mid deltoids.
-
You can perform military press using dumbbells, kettlebells or barbell. First, make sure to sit upright on a stool. Grasp onto your barbell with shoulder-width apart.
-
At the starting position, both of your elbows are tucked in and the bar lay on your upper chest. To execute the movement, simply push the bar upward with your arms fully extended. The bar or dumbbells should be at the overhead position at the top of the lift.
-
One thing you need to make sure is to keep your core tight, spine erect and head held up as you perform the exercise.
-
Finally, lower your weights slowly until its back to the starting position. You don’t want the weight slamming down at you so make sure you move the weights in a slow, controlled tempo for gains and safety.
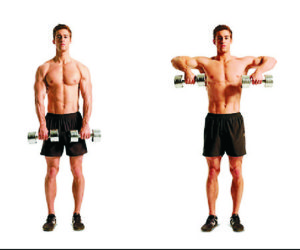
4) Seated Alternate Dumbbell Press
Seated Alternated Dumbbell Press, another variation of military press with more control and isolation.
-
Lift two dumbbells in a continuous motion, keeping the back straight and the head up, until they are at shoulder height.
-
Position the feet firmly on the floor and push against the floor for stability. Notice that the heel of the prosthetic leg is pushing against the floor.
-
Keep the elbows out to the sides and the thumbs facing each other.
- Lift to mid-chest level.
5) Upright Rowing
Upright Rows, a killer workout for the middle deltoids.
-
First, stand upright with your knees slightly bent to buffer the weights. Then, prepare a set of dumbbells, kettlebells, barbell or EZ-barbell to perform the exercise.
-
To move into the starting position, stand upright with the weights hanging on both sides.
-
Your feet should be shoulder-width apart and slightly bent for balance.
-
You should apply overhand grip for this exercise and keep both hands close to each other. From that position, raise the weights upward to your chin in a pulling motion. Imagine carrying 2 pails of water vertically while standing upright.
-
At the top of the lift, the elbows should flare out to the sides and keep them as high as possible.
-
Remember to pause and squeeze at the top of the lift before lowering them back down to the starting position.
-
Repeat the movement until you’ve completed your desired repetitions.
6) Seated Bent-Over Rear Deltoid Raise
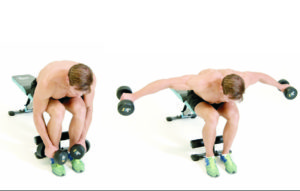
This workout targets the rear delts, a part where most people neglect but essential to bring out the round, boulders. Here’s how you do it:
-
Select two lightweight dumbbells (10 pounds or less for the beginner); place them on the floor on either side of the end of a flat bench.
-
Sit at the end of the bench with your feet fairly close together and planted firmly on the floor. The dumbbells should be on either side below where you are sitting.
-
Lean forward so that your chest almost touches your thighs. Keep your head facing the floor. Lift the dumbbells to the height of your ears.
-
Raise the dumbbells out and upward, straightening your arms and locking the elbows.
-
Lower and raise the dumbbells in a continuous semi-circular motion, keeping your arms straight and elbows locked.
-
Inhale as the dumbbells are raised; exhale as they are lowered.
You don’t have to go heavy for this exercise, as the rear delts are not huge muscles. Try doing it for 12-15 reps each set with control for best results.
How To Get Washboard Abs
Are you slumping in the couch right now? With your tummy bulging from beneath your shirt? Fatty, one pack, beer belly – are you sick and tired of these words?
Or have you been suffering from being overly skinny and bony, that it makes you feel small, weak and vulnerable?
Abs is a short form for abdominal, which is your stomach muscles.
A well-developed rectus abdominal or six-pack abs, seems to be the end goal of any exercise regimen. It is this muscle group that is one of the most challenging to build, as tons of effort and brutally intense workout do not magically guarantee a successful outcome. Think of your abs as a bi-product, not a muscle that you build. Like a bonus of work from a job well done.
But if you aim for overall well-being first and six-pack abs second, you are more likely to keep up the vigorous training needed to get that enviable perfect physique.
The Solid Foundation To Get Washboard Abs
-
Burn Your Fats First
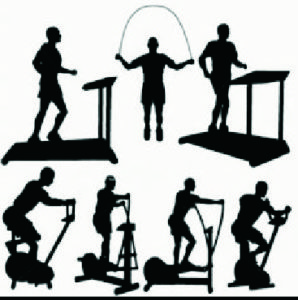
Want to burn those unwanted fats? Perform some regular aerobic activity. You can’t spot-reduce abdominal fat. You need to burn your overall body fat before your body allows you to start building specific muscle group.
Cycling, jogging, running, jumping rope, and swimming are some good aerobic exercises to achieve this. To enable your body to begin burning your stored fat, you should blast fat for at least 30 minutes by performing heart-rate-elevating exercises. This is because your body only burns energy from food during the first 20 minutes. The ideal calculation is 30 minutes for at least four times a week. It is best done before breakfast as it triggers your body to burn your previously stored fats.
-
Crunches Exercise
Tone your abs with crunches. There are three types of crunches to target specific region of your abdominal area to achieve an evenly sculptured washboard abs.
-
Regular crunches (tonnes upper abdomen)
-
Find a place with a solid support for your back. Lie on an exercise mat to prevent straining your back.
-
Your knees should be bent. Your feet position should be as wide as your hips and both should be flat on the floor. Your hands should be behind your head. Hold your chin forward, not tucked into your chest. Try to gaze at the ceiling while you’re doing this workout to ensure your chin is in the right, safe position.
-
Exhale contract your abs muscle. Use your abs muscle to lift your head. Do not pull your head up with your hands.
-
Pause for a moment. Squeezing your abdominal muscle as you do so then inhale slowly and ease your back down the starting position. You must control your movement while lifting your back up and going back down. Do not release and let go rapidly.
-
Relax your muscles for a moment, exhale and repeat. Throughout the exercise, be mindful to keep your knees bent and your feet in the same position. Never lift your lower back off the floor.
-
Reverse crunches (tonnes lower abdomen)
-
Similar to the regular crunch, your hands are behind your head, your shoulders off the floor, but this time you are going to have knees in the air to start the movement.
-
With your feet and knees up, pull your knees as close as you can and hold that position. From there just go back and forth
-
A good reverse crunch that targets the lower abs would be a small movement
-
Each crunch needs to be a squeeze and not a rocking motion
-
Don’t let your upper body move too much.
-
Repeat for several times.
-
Bicycle crunches (tones obliques, aka “love handles”)
-
Find a place with a solid support for your back.
-
You can support your hands behind your head to make sure you are not yanking on your neck. This may cause pain and problems. You are just supporting your head.
-
Keep your shoulder blades off the ground. Bring knees up to 90 degrees. Bring your right elbow to left knee as you alternate side to side. Your goal is to get your elbow as close to the inside of that knee as you can
-
Now simultaneously, slowly go through a cycling motion
-
Continue alternating in this manner.
-
Bear in mind that it is essential that you increase the difficulty of your exercises and change the variety of your workout routines every two months. This is to allow your muscle to recuperate and burn calories efficiently. Do these routines at least three times a week. Remember that crunches are best done very slowly and always with control.
-
Eat smart
Avoid processed foods (at all means if you can!). Foods that have undergone preservation or packing have lost their nutrients. And worse, processing adds on unhealthy fats, plenty of sugar or sugar substitute, and synthetic vitamins and minerals. Most the ingredients in processed foods include sweeteners, coloring, and hydrogenated oils. These ingredients are not even recognized by your body as edible ingredients, so they end up being stored as fats.
-
Eat healthy fats
Fats have a bad reputation, but not all fats are harmful. Dietary fats coming from monounsaturated and polyunsaturated fats are food for you. Olive oils, fish oils, natural peanut butter, avocado, and almonds are some really good examples.
Just make sure to keep your intake between 20% and 30% to regulate your calories. This will help stabilize your insulin level, which if too high, causes fat retention. By eating healthy fats, you are more likely to stay away from the fridge looking for food, as these healthy fats tend to keep you sated for a longer time. Most often, eating only protein or carbs alone will make you hungry more often.
-
Drink plenty of water
Studies have shown that people who drink a lot of water lose more weight and are able to keep it off longer. Adequate water intake boosts your metabolism rate. Drinking more water helps you stay away from empty-calorie drinks like soda and processed juice.
-
Eat good carbs
Good carbs like whole grains are rich in fiber and go through your system much slower than refined, white carbs. Therefore, it avoids spikes in blood sugar levels. Instead of your normal to-go carbs, always opt for healthy carbs – whole grains, nuts, pumpkin, potatoes.
7.Eat protein for breakfast
What’s more important than feeling your tummy with protein early in the morning? A protein-packed breakfast is closely related to increased feelings of fullness and this would help to reduce your desire to snack. For example, instead of the usual ham and eggs, maybe you can go for nuts, egg whites, and cottage cheese. Eat less but often. Rather than eating 3 big meals per day, you can eat 5 meals per day, but each with a smaller portion. When your body in hungry, it likes to hoard fat, causing you to crave foods like pizza, burgers, and pastries. If you’re rarely hungry, your metabolism learns to stabilize, and you won’t feel food cravings.
If you would like to try a stricter diet to keep your blood sugar level balanced throughout the day, eat 4 – 5 proper meals in bite-sized portions. You tend to not overeat this way because you’ll be consuming foods high in fiber, protein, and nutrients.
We’ve just unlocked the secrets to getting washboard abs! It’s all about making small lifestyle choices in order to reduce body fat! Eat clean, take it easy on junk food, drink plenty of water work those abs and do cardio!
Abs are yours for the taking!
sponsored ads
**********************************************************************************
***********************************************************************
